Friday, December 26, 2014

Comparing Casings to Firearms


For the December 2014 segment of Righting Crime Fiction, I will continue talking about how you can use firearms evidence to solve your fictional crimes that involve guns, with a focus on spent shell casings and the link between casings and firearms.

FIRING PIN FINGERPRINTS

A bullet casing can be scarred in a number of ways upon being fired and ejected from a firearm, but the most beneficial and telling “scar” would be from the firing pin. When a firing pin strikes the primer (on centerfire bullets) or the rim (on rimfire bullets), it leaves a unique mark similar to a fingerprint. What happens is this: the firing pin strikes every bullet it fires in the same way each and every time (unless there is damage or some other change to the weapon), which leaves the exact same imprint each and every time. This “fingerprint” left by the firing pin is extremely helpful in determining if a particular firearm fired a particular bullet casing.

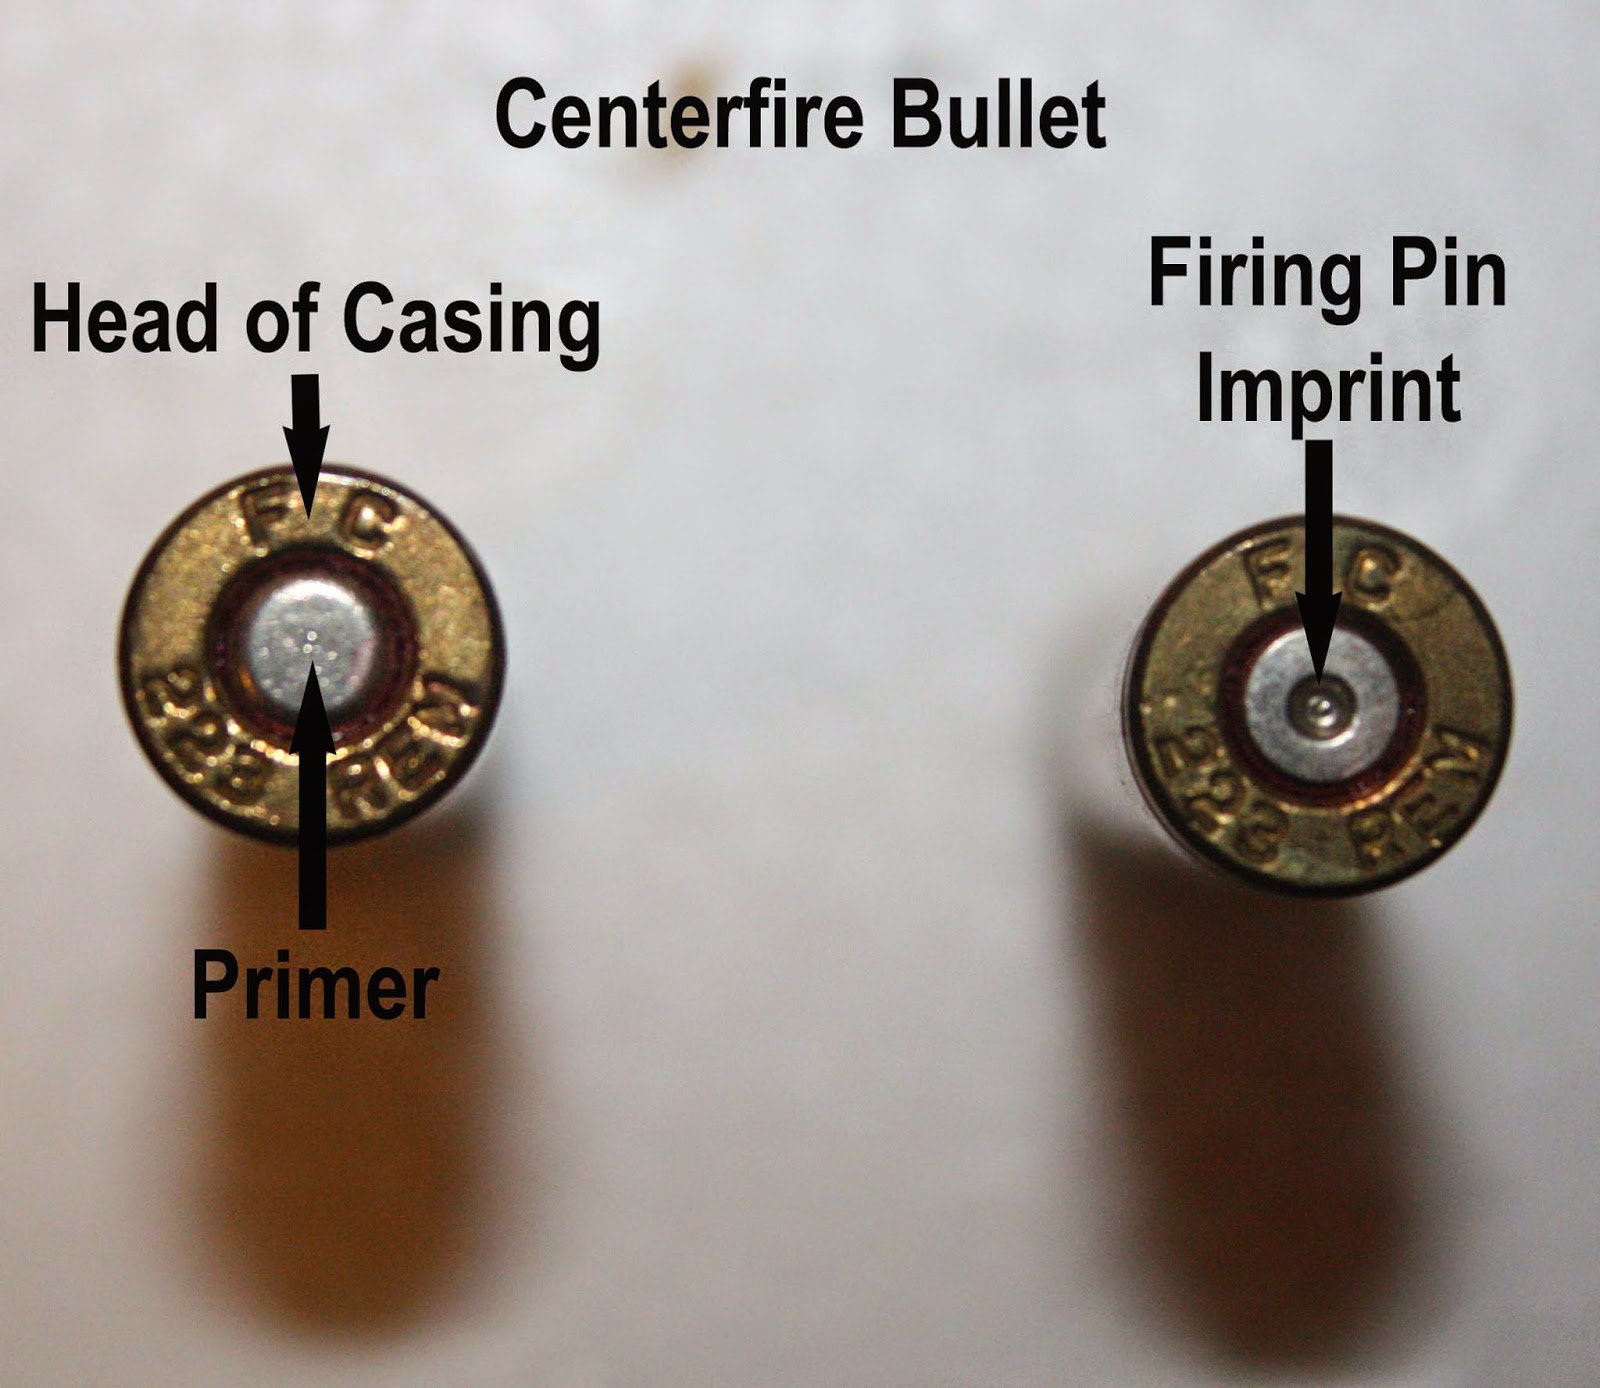
CENTERFIRE VERSUS RIMFIRE

What’s the difference between centerfire and rimfire? Quite simply, the firing pin on a centerfire weapon will strike the center of the casing’s head (the primer), while the firing pin on a rimfire weapon will strike the rim of the casing’s head (where the priming compound is located). Most modern firearms are of the centerfire variety. However, there are still numerous rimfire weapons available, many of which fire the very popular .22 caliber bullet.

Plinkerton .22 Caliber Single-Action Revolver


NOTE: The following two photographs demonstrate the difference between a centerfire bullet and a rimfire bullet. In both photographs, the unfired bullet is to the left and the spent shell casing is to the right.

Centerfire Bullet/Casing


Rimfire Bullet/Casing


LINKING THE SCENE TO THE GUN

If your detective only has spent casings in her possession and no firearm to which she can compare them, the casings are nearly useless. (They might make for a cool-looking necklace, but, other than the benefits previously described in the November segment regarding caliber identification, etc., they won’t help her solve her case.) Of course, there are at least two ways to use the lone shell casings without an accompanying firearm (I will discuss one in a later post and the other at the end of this section), but in most cases it is imperative that she recover the firearm used in the commission of the crime. In real criminal cases, we have to work with what we have and there are many times when we are unable to recover the firearms used in the crime. However, you control your fictional world and you can work out creative ways for your detective to recover the firearm—unless it suits your story to keep the firearm hidden.

With the casings and the firearm in her possession, your detective is now ready to attempt to have the two linked together. The first thing she would do is submit the spent casings and the firearm to the lab. Once at the lab, these items may be processed for other evidence (DNA, fingerprints, etc.) before the ballistics examination begins. When these other tasks are completed, the firearms examiner can begin comparing the spent casings to the firearm.

The examination is not carried out by directly comparing the spent casings recovered at the scene to the suspected firearm. Instead, the firearms examiner will compare the spent casings recovered at the scene to a “known” spent casing fired from the firearm. In order to obtain this “known” casing, the firearms examiner would test fire the firearm under controlled conditions (usually by firing into a large water tank located at the crime lab), and then compare the firing pin marks on the recovered shell casings to the firing pin mark on the “known” casing by viewing them side-by-side under a microscope. If these marks are the same, the firearms examiner can conclude that the casings were fired from the same firearm. In addition to these firing pin marks, or “fingerprints”, the examiner will search for other unique “scars” left on the spent casings, such as the ejector or extractor marks. These additional marks will aid the examiner in bolstering his conclusion that the spent casings located at the crime scene were fired from the firearm in question.

Now, when your detective links a spent shell casing she recovered from a crime scene to a particular firearm, she has linked the crime scene to that weapon. She must then link the firearm to the suspect, and I will discuss that in a future post.

WHAT IF MY DETECTIVE DOES NOT HAVE A FIREARM?

If your detective does not have the suspected firearm in her possession—as mentioned earlier—the casings are nearly useless. However, certain casings can be entered into a database called IBIS (Integrated Ballistics Identification System)/NIBIN (National Integrated Ballistic Information Network), where they would be compared against other casings recovered in connection with other crimes around the country. If the system identifies two casings that are similar, a firearms examiner would then compare the two to make a final determination. Now, this would indeed be a long shot, and you should seek out more creative ways (I’ll discuss one in a future post) to have your fictional detective link the casings to a particular firearm.

TRANSFERRING TO FICTION

Unless you are writing your story from the point of view of a firearm’s examiner, you only need a very basic knowledge of the examinations process, as described above. As a detective, I simply recovered my evidence in the proper manner and submitted it to the crime lab utilizing acceptable procedures (also to be discussed in a future post), and then I would sit back and wait (doing other things on the same case or working new cases, of course, but my work was done for the moment as far as that evidence was concerned). I would later receive a report from the lab detailing their conclusions. If more information was needed, I’d simply call the examiner and discuss his or her findings.

In the following example from one of the first short stories I ever wrote (A COLD MURDER, Detective Mystery Stories Magazine, February 2004), the firearms examination takes place off-page and the results are communicated in dialogue:

Cade knelt outside the driver’s door of the truck and looked under the seat. There was a Burger King bag and a couple of compact discs. He pulled the bag out and something rolled across the floorboard and came to rest under the brake pedal. He felt for the small object and, when his fingers found it, he knew instantly what it was—a nine-millimeter shell casing.

“Les, stand in front of the truck,” he said, excitement starting to course through his veins. He stood outside the open driver’s door and pointed his finger at Leslie. “If I’m shooting at you, my casings are gonna eject to the right and back. Most of the casings will ricochet off the side of the truck and fall to the ground, where we found them. But one—that missing one—found its way into the truck. I’ll bet my left foot this is the casing that we couldn’t find at the scene.”

Leslie kept the Cassells preoccupied while Cade raced to the crime lab. He stopped first at the firearm examiner’s office and then hurried down the hall to the fingerprint lab. Within the hour he was back at the station house with the results.

When he and Leslie were seated in his office with Joseph Cassell, he held up the casing and said, “You see this?”

Joseph nodded.

“This was found under the driver’s seat in your truck.”

“I have lots of fired casings around the house and in my truck. When I go deer hunting I usually throw my empties in the back of my truck. I clean them up later. I must’ve missed that one.”

“You hunt deer with a pistol?”

“No. I have a nine millimeter carbine that I use.”

“Well, this is a special casing.” Cade set it on the desk in front of Joseph. “This casing matches four other casings that were found at the scene of Jeffery Stokes’ murder. And that’s not all. We found Jeffery Stokes’ fingerprints on the hood of your truck.”

Joseph started in his chair. “Are you saying I did this?”

“If you did, I wouldn’t blame you much. Had I just learned some sick pervert was taking nude photos of my daughter—”

I’ve also worked actual cases where the firearms examiner processed the evidence as I waited, and I detailed such a scene in another of my early short stories titled A BADGE LIKE MINE (The Writer’s Hood, October 2003):

I drove to the crime lab and gave Willie the chrome pistol. “Check this against the bullets from the Wilson murder . . .  I’ll wait.”

“Oh, you want it done now?” Willie asked.

“Please. It’s kind of important.”

Willie took the pistol and fired it into a large water tank. The casing ejected from the pistol and bounced off the wall and rolled under the tank. Willie fished the projectile out the tank and asked me to get the casing from underneath. “My back ain’t what it used to be,” he said.

I had to use a broom to get it out and then handed it to Willie. He marked it and then stabbed it onto a piece of clay opposite the casing that was recovered in the Wilson murder. Muttering to himself, he hunched over his microscope and turned this knob just so, adjusted that one a little, moved the casing ever so slightly . . .

“Yep,” he finally said. “This is a match.”

So, it’s as simple as that. You can have your firearms examiner come to the conclusion that will move your story in the direction you want it to go. Bear in mind, though, that in the majority of real cases, firearms evidence will take days, weeks, or even months to be processed at the lab, especially if submitting to a state crime lab with a heavy workload. However, if you need ballistics evidence to come in quickly for the sake of your story, that is also realistic. I worked several murder cases where time was of grave importance and the firearms examiner processed the evidence on the spot while I waited.

Well, that’s all for the December post, folks. I wish all of you a happy, healthy and prosperous New Year filled with lots of writing success.

Until then, write, rewrite, and get it right!

BJ Bourg is the author of JAMES 516 (Amber Quill Press, 2014), THE SEVENTH TAKING (Amber Quill Press, 2015), and HOLLOW CRIB (Five Star-Gale-Cengage, 2016).  
©BJ Bourg 2014

Saturday, November 15, 2014

Spent Casings and Crime Scenes


Welcome to the November 2014 edition of Righting Crime Fiction. As I mentioned last month, I’ll discuss how your fictional detective can use firearms evidence to solve crimes that involve guns. If you know next to nothing about firearms and you want to write a murder mystery that involves a gun, it might seem a daunting task. However, with just a basic understanding of the types of evidence that firearms can leave behind and how to link those pieces of evidence to each other and to your bad guy, you’ll be able to easily write convincing scenes involving guns and ammunition.

I’m going to break this up into a few blog posts, because it can turn into “information overload” if I’m not careful. For this month’s edition, I’ll discuss what a spent casing can immediately tell your detective at the scene and I'll demonstrate how shell casings are deposited at crime scenes.

SPENT SHELL CASINGS TALK

If someone fired a single shot into the air on a desolate road at night and then disappeared, leaving behind nothing but one spent shell casing, that single shell casing will offer your detective some valuable information. The most obvious and immediately helpful thing it will tell her is the caliber of the bullet, and, from that one piece of information, she can deduce a lot.

Spent Casing vs. Live Round


First, the reason it’s “obvious” is because most detectives can recognize the more commonly used calibers by sight. If they can’t recognize the caliber by sight, all they need to do is look at the face of the casing, where the caliber information will have been stamped onto it during the manufacturing of the casing. The above bullet and casing are .223 caliber.

Second, the reason it’s “immediately helpful” is because she can instantly rule out every weapon that could not have fired that round. If she didn’t know the caliber of the firearm used, every gun in the world could be a potential suspect. Armed with the caliber information, she could then narrow down her search to only the firearms that could’ve fired that round.

Let’s imagine she locates a spent .357 magnum shell casing on that lonely road. She can then rule out every type of semi-automatic handgun (except for those few that can fire a .357 magnum bullet, such as the Mark XIX Desert Eagle), every type of long gun (except for those few that can fire a .357 magnum bullet, such as the Marlin Model 1894), and every type of revolver that is not chambered in .357 magnum. She can now concentrate her efforts on the finite number of guns that could have possibly fired the bullet, rather than on every type of gun ever made.

TRANSFERING INTO FICTION

Writing spent shell casings into your story is easy to do and it can help you plant clues for your readers along the way. If you mention early in your story that a spent nine millimeter shell casing was located at the crime scene, every person you mention thereafter who owns a gun capable of firing nine millimeter bullets could be a possible suspect.

If you’ve been a writer for five minutes, you know we’re supposed to “show” rather than “tell”. Thus, I’m not simply going to “tell” you how easy it is to write spent shell casings into your story—I’m going to “show” you.

Here’s an excerpt from my current work in progress:

I scanned the immediate area and spotted two spent shell casings on the floor just inside the door.

See? It’s that easy. How do we let our readers know the caliber of the casings? Here’s another excerpt later in the same chapter:

Susan crept along the living room floor toward the hallway and called out when she found another spent casing against the baseboard of the back wall. “That makes four.”

“Are they all nine millimeters?” I asked.

“Yeah.” Susan’s brow furrowed. “How’d you know it would be here?” 

Now, what happens if your detective locates two different types of spent shell casings at the scene, such as five nine millimeter casings and six .357 magnum casings? This could mean that there were two shooters or that one shooter had two guns. You can experiment with this to add some degrees of difficulty to your story and make it harder for your detective to figure out “whodunit”.

IT’S NOT MAGIC

Casings don’t magically appear at a crime scene. Some action has to take place for the casing to leave the firearm and end up on the scene. If you fire a semi-automatic or fully automatic weapon, the action of pulling the trigger would be enough to eject the casings, because the recoil-action from some weapons (Glock handgun, Beretta handgun) and the gas action of others (AR-15 rifle, AK-47 rifle) will automatically strip the spent casing from the chamber and “spit” it out.

Colt AR-15 .223 Semi-Automatic Rifle


Romarm/Cugir AK47 7.62x39 Semi-Automatic Rifle


I went out to the range the other day and made a video to demonstrate how a semi-automatic firearm deposits spent casings at the scene. It depicts me firing a few rounds at regular speed, one round at slow speed (so you can watch how the pistol works), and then I fire a couple more rounds until the slide locks back. I discussed in a previous post how the slide locks back on an empty magazine on certain pistols—well, here it is in action:

Live Fire – Semi-Automatic Pistol


Did you notice the flashes of copper-colored metal flying in the air above me each time I’d shoot? Those were the shell casings. I’ll discuss in a future segment what the location of casings at the scene can tell your fictional detectives.

In other types of firearms, some manual action has to take place in order to eject the shell casing. A few different types of actions include pump-action (Benellli Nova 12 gauge shotgun), lever-action (Mossberg 30-30 rifle), and bolt-action (Accuracy International Model AE .308 sniper rifle). In order to leave a spent casing at the crime scene, your bad guy would have to fire a round and then manipulate the action. In addition to ejecting a spent casing, this action would also push a fresh (live) round into the chamber.

Benelli Nova 12 Gauge Shotgun


Here's a video of me working the pump action on my Benelli (it's a sound that can strike fear in the hearts of anyone who recognizes it, especially if you're a boy knocking on your girlfriend's window late at night):


“Pumping” a Shotgun


Accuracy International Model AE .308 Sniper Rifle


Here's a video of me bolting my Accuracy International sniper rifle:


“Bolting” a Sniper Rifle


Revolvers have a repeating action. As your bad guy pulls the trigger, the action of cocking the hammer, rotating the cylinder, and dropping the hammer is repeated until all of the live rounds are fired. The spent casings remain in the individual chambers until your bad guy reloads.

Keep this in mind: if your fictional detective finds casings that were fired from a revolver at the scene, it usually indicates the shooter reloaded at the scene. I've only witnessed this once. A man killed another man and then reloaded his revolver when he saw headlights approaching his location. It turned out to be a police officer. The suspect fired on the officer and, in the exchange of gunfire, the suspect was killed.


Smith and Wesson .44 Magnum Revolver


WORKING VARIOUS ACTIONS INTO FICTION

How does this information transfer to fiction? Consider this excerpt from my short story SNIPER'S CHOICE (Static Movement, August 2009), where I detail a sniper manipulating the bolt on his rifle:

The instructor began the countdown. When he said, “Fire!”, I dropped to the ground and pulled the butt of the sniper rifle snug into my shoulder. When the crosshairs locked on the lemon at one hundred yards, I squeezed off the shot. It exploded. My body went into autopilot. I bolted a fresh round and took out the next target. My hand was like a machine. I fired until my rifle was empty and my targets were only a misty memory.

I didn’t detail every step of the bolt-action process, because it’s not necessary and would be too technical. With the few words, I bolted a fresh round, I show readers that something has to happen to get a live round into the chamber. Instead of repeating that phrase four times, I try to paint a picture to let readers know the sniper fired multiple rounds in rapid succession by simply writing, My hand was like a machine. I fired until my rifle was empty.

CONCLUSION

That’ll wrap up Righting Crime Fiction for November. I’ll continue the discussion about shell casings in December. Until then, write, rewrite, and get it right!

BJ Bourg is the author of JAMES 516 (Amber Quill Press, 2014), THE SEVENTH TAKING (Amber Quill Press, 2015), and HOLLOW CRIB (Five Star-Gale-Cengage, 2016).
 
©BJ Bourg 2014

Sunday, October 5, 2014

Semi-Automatic Pistol Basics


Welcome to the October 2014 edition of Righting Crime Fiction. This month I’ll pick up where I left off last month and continue discussing handguns—more particularly, semi-automatic pistols.

SEMI-AUTOMATIC PISTOLS

Quite simply, and without getting technical, a semi-automatic pistol is a handgun with a single barrel and chamber that uses the energy from the previously-fired bullet to load a fresh bullet into the chamber. The amount of times it can reload itself depends on the capacity of the magazine. If the magazine holds fifteen bullets, you would be able to pull the trigger fifteen times before having to replace the magazine.

SEMI-AUTOMATIC PISTOL NOMENCLATURE

Before delving too far into the subject, we need to familiarize ourselves with the parts of a semi-automatic pistol. I have created a diagram using my Beretta 92FS 9mm pistol to assist us in accomplishing this goal. There are plenty of parts, so follow the arrows closely to ensure you are identifying the correct one:


DOUBLE-ACTION VERSUS SINGLE-ACTION

Just like there are single-action revolvers and double-action revolvers, there are also single-action semi-autos (Colt Model 1911-A1) and double-action semi-autos (Beretta 92FS). Like revolvers, many double-action semi-autos can be fired single-action and double-action, but single-action semi-autos can only be fired single-action. Most double-action semi-autos are double-action for the first shot, but then they revert to single-action afterward, because the hammer automatically remains in the cocked position after the first shot, unless it is “decocked” by manipulating the safety or “decocker”.

Colt Model 1911-A1


Beretta 92FS


There are hammerless pistols that possess internal hammers or internal firing mechanisms. The Glock 22 is an example of a hammerless pistol. While we’re talking about the popular Glock, it’s important to note that they possess safety mechanisms such as the trigger safety, firing pin safety, and drop safety, but they do not possess a manual safety. Thus, it’s important that you not have your heroine “flip the safety” on her trusty Glock.

Single-Action Pistol


Double-Action Pistol


Hammerless Pistol


HOW BULLETS WORK

Before I go any further, let’s talk about the four parts of a bullet. Understanding how bullets work will make it easier to understand how semi-automatics operate. Here’s a picture of a bullet that is intact:


The next four pictures depict the same bullet disassembled, with arrows pointing to the four major parts:


The “casing” houses the other parts of the bullet. The “head” end of the casing is closed, with the exception of a tiny flash hole, and the “mouth” end, which is where the projectile is seated, is open.


The “primer” is an impact-sensitive cap seated in the face of the casing that’s used to ignite the powder.


The “powder” is a fast burning compound that’s used to propel the projectile forward.


The “projectile” is the business end of the bullet—the part that kills. Most projectiles are made from lead and are covered in part—or in full—by a metal “jacket”.

Quite simply, when you pull the trigger on a firearm this is what happens to the bullet: the firing pin strikes the primer, which creates a spark that shoots through the flash hole, which ignites the gunpowder within the casing, which causes a small explosion and generates lots of energy, which propels the projectile down the barrel at a high rate of speed.

Terminology Note: A bullet that has not been fired is commonly referred to as a “live round”, while the casing from a fired bullet is referred to as a “spent” casing. Some folks call a live round a “cartridge” and a projectile a “bullet”. For the sake of consistency, I try to always use “bullet” or “live round” and I call the killing part of the bullet a “projectile”. I do this in my police reports and in my fiction. Either way is acceptable, as long as you remain consistent in order to avoid confusion.

HOW SEMI-AUTOMATIC PISTOLS WORK

So, the energy from the fired bullet is what operates the semi-automatic pistol. Without getting technical, this is what happens to the semi-automatic pistol when it’s fired: 1) the counter-energy from the fired bullet forces the slide rearward, 2) the slide grabs the spent casing on its way rearward and ejects it (throws it away from the pistol), 3) an internal “recoil spring” forces the slide forward, 4) on its way forward, the slide strips a live bullet from the magazine and pushes it into the chamber, and 5) the sequence is repeated until the magazine is empty, at which time the slide locks to the rear.

The following “action” photograph depicts a semi-automatic pistol (Beretta 92FS) with the slide in the rearward position immediately upon being fired:


Notice the spent shell casing in mid-air as it is ejected from the chamber. Semi-automatic firearms spit out these casings like you would spit out the shells of a sunflower seed—except much faster. Also notice how the pistol is positioned at a slightly upward angle. This is from the recoil.

The following photograph was the next in this series of “action” shots and was taken in rapid succession. It depicts the slide in the forward position and the hammer cocked, ready for a follow-up shot:


To understand how instant the slide returned to its forward position and the shooter (my son, Brandon) got his sights back on target, notice the car in the background and to the left of the pistol in both photographs. The speed limit for that highway is 65 miles per hour and the car traveled approximately two short car lengths in the amount of time it took the slide to move forward and Brandon to get the front sight back on target.

The following photograph shows what the same semi-automatic pistol looks like from the top view with the slide in the rearward position:


As the slide moves forward, it strips a live round from the magazine and pushes it into the chamber, readying the pistol for another shot. Again, once you’ve fired the last round, the slide will lock to the rear, indicating it’s time to feed the pistol another magazine, or “clip”.

Since your heroine may need to load or unload her semi-automatic pistol someday, it’s important that you know how to perform these tasks, as well. If you’ve never done this, viewing a video of it might help. I’ve created a video of me loading my Glock 22 and another of me unloading it and will post them here, along with written instructions.

Note: The demonstrations will be for right-handed folks. It’s similar for left-handed folks, but with slight variations. Contact me for more information.

LOADING THE SEMI-AUTOMATIC PISTOL

Step One: Holding the pistol in your right hand, ensure that the muzzle is pointed in a safe direction.

Step Two: With your left hand, insert a fully loaded magazine into the magazine well until it locks. It’s a good idea to give the magazine a little tug to ensure it’s seated properly.

Step Three: With your left hand, retract the slide fully to the rear and release it. Once you release the slide, it will spring forward and strip a live bullet from the top of the magazine and push it into the chamber, loading the pistol. If you had a fifteen-round magazine, there would now be fourteen rounds in the magazine and one in the chamber of the pistol. If you want to “top off” the magazine—meaning you want to replace the live round that was stripped from the magazine, in order to allow yourself the maximum number of bullets at your disposal—you would move on to Step Four.

Step Four: With your right thumb, press the magazine release button and remove the magazine with your left hand. Place your pistol someplace where it’s secure, such as a holster, and then “top off” the magazine by loading another bullet into it.

Step Five: With your left hand, reinsert the magazine into the magazine well until it locks into position and give it a tug to ensure it is seated properly. You now have sixteen bullets at your disposal.

Bear in mind, if your hero were in a shootout, he would not have time to top off his magazine. He would have to reload his pistol quickly and get back into the gunfight.

Loading the Semi-Automatic Pistol


UNLOADING THE SEMI-AUTOMATIC PISTOL

Step One: Holding the pistol in your right hand, ensure the muzzle is pointed in a safe direction.

Step Two: With your right thumb, press the magazine release button and allow the magazine to fall to the ground. This part is very important! Picking up—or catching—an empty magazine during a gunfight could prove deadly. Since folks resort to their training under pressure, it’s important not to develop any bad habits during training. Thus, always have you heroine allow her empty magazines to fall to the ground during training.

Step Three: With your left hand, retract the slide fully to the rear and lock it in the “open” position by pushing the “slide release button” upward with your right thumb.

Step Four: Visually inspect the chamber and magazine well to ensure they are clear of live rounds.

Unloading the Semi-Automatic Pistol


Well, that wraps up Righting Crime Fiction for October. I plan to discuss the type of evidence firearms leave behind at crime scenes and how they can be linked to suspects in the November installment.

Until next time, write, rewrite, and get it right!

BJ Bourg is the author of JAMES 516 (Amber Quill Press, 2014), THE SEVENTH TAKING (Amber Quill Press, 2015), and HOLLOW CRIB (Five Star-Gale-Cengage, 2016).
 
©BJ Bourg 2014